This article demonstrates how to create and use a TextBox control in WPF using XAML and VB.NET.
Creating a TextBox
The TextBox element represents a WPF TextBox control in XAML.
<TextBox/>
The Width and Height attributes of the TextBox element represent the width and the height of a TextBox. The Text property of the TextBox element sets the content of a TextBox. The Name attribute represents the name of the control, which is a unique identifier of a control.
The code snippet in Listing 1 creates a TextBox control and sets the name, height, width, and content of a TextBox control.
<TextBox Name="TextBox1" Height="30" Width="200"
Text="Hello! I am a TextBox.">
</TextBox>
Listing 1
The output looks like Figure 1.
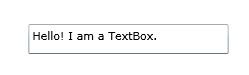
Figure 1
As you can see from Figure 1, by default the TextBox is place in the center of the page. We can place a TextBox control where we want by using the Margin, VerticalAlignment and HorizontalAlignment attributes that sets the margin, vertical alignment, and horizontal alignment of a control.
The code snippet in Listing 2 sets the position of the TextBox control in the left top corner of the page.
<TextBox Name="TextBox1" Height="30" Width="200"
Text="Hello! I am a TextBox."
Margin="10,10,0,0" VerticalAlignment="Top"
HorizontalAlignment="Left">
</TextBox>
Listing 2
Formatting a TextBox
The BorderBrush property of the TextBox sets a brush to draw the border of a TextBox. You may use any brush to fill the border. The code snippet in Listing 3 uses a linear gradient brush to draw the border with a combination of red and blue color.
<TextBox.BorderBrush>
<LinearGradientBrush StartPoint="0,0" EndPoint="1,1" >
<GradientStop Color="Blue" Offset="0" />
<GradientStop Color="Red" Offset="1.0" />
</LinearGradientBrush>
</TextBox.BorderBrush>
Listing 3
The Background and Foreground properties of the TextBox set the background and foreground colors of a TextBox. You may use any brush to fill the border. The following code snippet uses linear gradient brushes to draw the background and foreground of a TextBox.
<TextBox.Background>
<LinearGradientBrush StartPoint="0,0" EndPoint="1,1" >
<GradientStop Color="Blue" Offset="0.1" />
<GradientStop Color="Orange" Offset="0.25" />
<GradientStop Color="Green" Offset="0.75" />
<GradientStop Color="Red" Offset="1.0" />
</LinearGradientBrush>
</TextBox.Background>
<TextBox.Foreground>
<LinearGradientBrush StartPoint="0,0" EndPoint="1,1" >
<GradientStop Color="Orange" Offset="0.25" />
<GradientStop Color="White" Offset="1.0" />
</LinearGradientBrush>
</TextBox.Foreground>
The new TextBox looks like Figure 2.
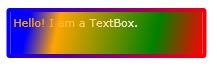
Figure 2
Setting Image as Background of a TextBox
To set an image as background of a TextBox, we can set an image as the Background of the TextBox. The code snippet in Listing 4 sets the background of a TextBox to an image.
<TextBox.Background>
<ImageBrush ImageSource="dock.jpg" />
</TextBox.Background>
Listing 4
The new output looks like Figure 3.

Figure 3
Creating a TextBox Dynamically
The code listed in Listing 5 creates a TextBox control programmatically. First, it creates a TextBox object and sets its width, height, contents, background and foreground and later the TextBox is added to the LayoutRoot.
Private Sub CreateATextBox()
Dim txtb As New TextBox()
txtb.Height = 50
txtb.Width = 200
txtb.Text = "Text Box content"
txtb.Background = New SolidColorBrush(Colors.Orange)
txtb.Foreground = New SolidColorBrush(Colors.Black)
LayoutRoot.Children.Add(txtb)
End Sub
Listing 5
Setting Fonts of TextBox Contents
The FontSize, FontFamily, FontWeight, FontStyle, and FontStretch properties are used to set the font size, family, weight, style and stretch to the text of a TextBox. The code snippet in Listing 6 sets the font properties of a TextBox.
FontSize="14" FontFamily="Verdana" FontWeight="Bold"
Listing 6
The new output looks like Figure 4.

Figure 4
The FontSource property allows loading custom fonts dynamically. The following code snippet sets the FontSource property.
Dim fontUri As New Uri("SomeFont.ttf", UriKind.Relative)
Dim MySRI As StreamResourceInfo = Application.GetResourceStream(fontUri)
TextBox1.FontSource = New FontSource(MySRI.Stream)
Non Editable TextBox
The IsReadOnly property of the TextBox sets the text box read only. By default, it is false.
IsReadOnly="True"
Restricting Text Size of a TextBox
The MaxLength property of the TextBox sets the number of characters allowed to input in a text box.
MaxLength="250"
Scrolling, Alignment, and Wrapping
The HorizontalScrollBarVisibility and VerticalScrollBarVisibility properties are used to set horizontal and vertical scroll bars of a TextBox, which is of type ScrollBarVisibility enumeration. The ScrollBarVisibility enumeration has four values - Disabled, Auto, Hidden, and Visible. The following code snippet sets the horizontal and vertical scroll bars visible in a TextBox.
HorizontalScrollBarVisibility="Visible"
VerticalScrollBarVisibility="Auto"
The TextWrapping property sets the wrap of no warp text. The following code snippet sets the wrapping text option.
TextWrapping="Wrap"
The TextAlignment property sets the text alignment in a TextBox, which is of type TextAlignment enumeration. A text can be aligned left, center, or right.
TextAlignment="Right"
The AcceptReturn property sets if the return is accepted in a TextBox or not.
AcceptsReturn="True"
Listing 7 shows all these properties in a complete sample.
<TextBox Name="TextBox2" Margin="10,10,50,0"
Width="300" Height="150"
HorizontalScrollBarVisibility="Visible"
VerticalScrollBarVisibility="Visible"
TextWrapping="Wrap"
TextAlignment="Right"
MaxLength="500"
IsReadOnly="False"
AcceptsReturn="True" >
</TextBox>
Listing 7
Selection in TextBox
The Select and SelectAll methods are used to select text in a TextBox. The Select method select a text range in a TextBox and the SelectAll method select all text in a TextBox.
The SelectionBackground and SelectionForeground properties set the background and foreground colors of the selected text. The SelectedText property returns the selected text in a TextBox.
The code in Listing 8 sets the selected text background and foreground properties and on button click event handler, returns the selected text of the TextBox.
Private Sub TextBox2Functionality()
Dim textBoxData As String = "Hey I am a text with scrolling and return functionality."
textBoxData += " You can select text it me and get the selected data. "
textBoxData += " How about setting background and foreground color of the selected text?. "
textBoxData += " Maximum lenght and a lot more to offer. "
textBoxData += " You can select text it me and get the selected data. "
textBoxData += " You can select text it me and get the selected data. "
textBoxData += " Also sets the selection background and foreground "
textBoxData += " Set font size and the font name. "
textBoxData += " You can select text it me and get the selected data. "
textBoxData += " Also sets the selection background and foreground "
textBoxData += " Set font size and the font name. "
textBoxData += " You can select text it me and get the selected data. "
TextBox2.Text = textBoxData
TextBox2.FontFamily = New FontFamily("Georgia")
TextBox2.FontSize = 12
TextBox2.SelectionBackground = New SolidColorBrush(Colors.Blue)
TextBox2.SelectionForeground = New SolidColorBrush(Colors.White)
TextBox2.SelectionStart = 100
TextBox2.SelectionLength = 200
End Sub
Private Sub Button_Click(ByVal sender As Object, ByVal e As RoutedEventArgs)
MessageBox.Show(TextBox2.SelectedText)
End Sub
Listing 8
The new output looks like Figure 5.
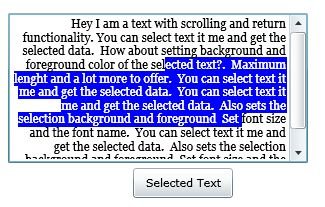
Figure 5
Summary
In this article, I discussed how we can create and format a TextBox control in WPF and VB.NET. After that we saw how to create a TextBox control dynamically. Then we saw how to set various properties of a TextBox such as making it non editable, restrict the size of text, and set the foreground an d background of the selected text.