Working with Theme in ASP. NET
Theme and Master page both are different. Master page allow to share the same content across all multiple pages but on the other hand Theme are allow to control the appearance of the content not the behaviour of the control.
heme and Master page both are different. Master page allow to share the same content across all multiple pages but on the other hand theme are allow to control the appearance of the content. In this application I am using skin, which enables you to modify Asp.net control property.
Step1: Add Theme by adding a new folder to a special folder in your root application. Right clicking on project in Solution Explorer drag your mouse on Add Asp.Net Folder you will see Theme option in list and click on that. See the below figure to know how to add theme in application. Different themes should be added on different folder in App_Themes folder. You can add multiple subfolders in Theme folder. A theme file contains different type of files but Skin and CSS file is most important file in Theme folder.
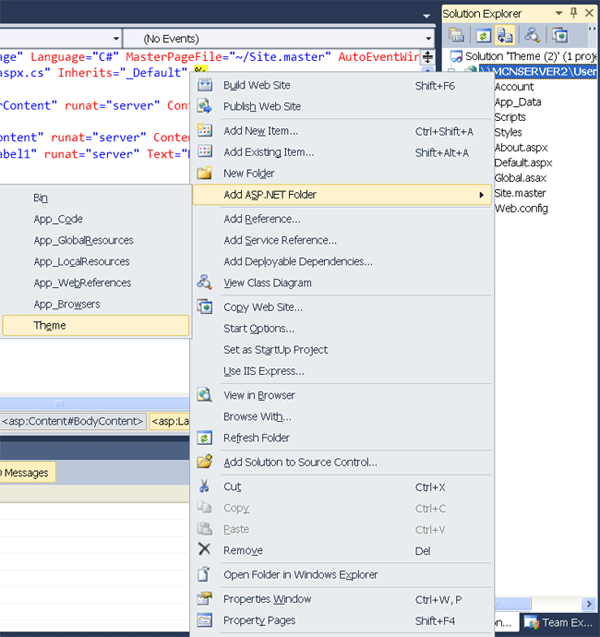
Figure 1
Step 2: After adding Theme Folder add skin file on that folder, right click on theme folder than click on Add New Item and select Skin file from dialog box. A Theme can contain one or more Skin files. A Skin modify the appearance any of an ASP.NET control but does not change the behavior property of any ASP.Net control. A Theme folder can contain a single Skin file that contains Skins for hundreds of controls.
Step 3: Open Skin file, App_Themes/Theme1/SkinFile.skin. Add three labels in Skin file. First, two labels represent named skin and last one represent default skin. Named Skin can be applied as per your demand but Default Skin automatically applied on all instance of control of certain type. Named skin use SkinID attribute to represent named skin.
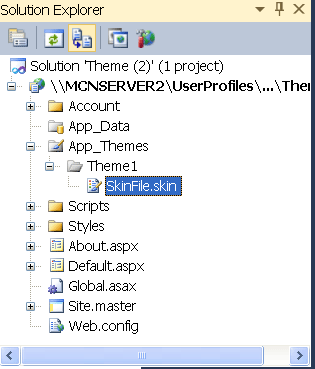
Figure 2
App_Themes/Theme1/SkinFile.skin
<%--First two label are named skin because they are containing SkinID attribute --%>
<asp:Label runat="server" SkinID="bgSilver" forecolor="blue" BackColor="Silver"/>
<asp:Label runat="server" SkinID="bgBlue" forecolor="white" BackColor="Blue"/>
<%--Below label is default skin --%>
<asp:Label runat="server" BackColor="Yellow" Height="40px" Width="200px"/>
Step 4: Open Default.aspx page and three labels on that page. One important thing you should include Theme attribute in <%@ Page%> directive.
<%@ Page Title="Home Page" Theme="Theme1" Language="C#" MasterPageFile="~/Site.master" AutoEventWireup="true" CodeFile="Default.aspx.cs" Inherits="_Default" %>
<asp:Content ID="HeaderContent" runat="server" ContentPlaceHolderID="HeadContent">
</asp:Content>
<asp:Content ID="BodyContent" runat="server" ContentPlaceHolderID="MainContent">
<asp:Label ID="Label1" SkinID="bgSilver" runat="server" Text="Named Skin"></asp:Label>
<br />
<br />
<asp:Label ID="Label2" SkinID="bgBlue" runat="server" Text="Named Skin"></asp:Label>
<br />
<br />
<asp:Label ID="Label3" runat="server" Text="Label"></asp:Label>
</asp:Content>
Output:
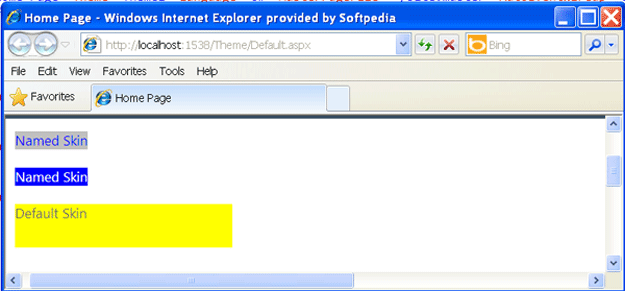
Figure 3
In the above output first two label display different appearance using different SkinID attribute both of them associated with different Named skin and last label used default Skin.
Step 5: If remove the SkinID from both labels you will see the different output and you will get how default skin works.
Default.aspx
<%@ Page Title="Home Page" Theme="Theme1" Language="C#" MasterPageFile="~/Site.master" AutoEventWireup="true" CodeFile="Default.aspx.cs" Inherits="_Default" %>
<asp:Content ID="HeaderContent" runat="server" ContentPlaceHolderID="HeadContent"></asp:Content>
<asp:Content ID="BodyContent" runat="server" ContentPlaceHolderID="MainContent">
<asp:Label ID="Label1" runat="server" Text="Named Skin change to default skin"></asp:Label>
<br />
<br />
<asp:Label ID="Label2" runat="server" Text="Named Skin change to default skin"></asp:Label>
<br />
<br />
<asp:Label ID="Label3" runat="server" Text="Default Skin"></asp:Label>
</asp:Content>
Output:
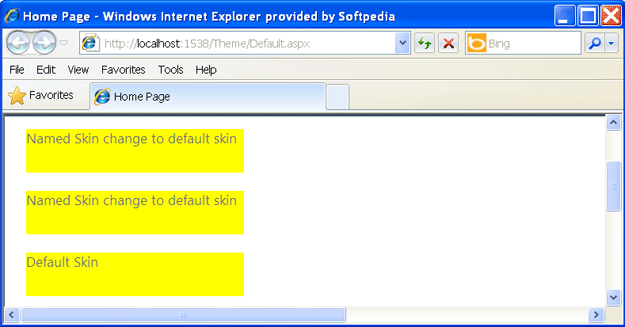
Figure 4
Apply Disabling Theme on control
You can disable theme on particular control or particular page. Using EnableTheming property of ASP. Net control, you can disable theme from control. Suppose you want to disabling theme on first label and EnableTheming="false" on Label1.See the below code.
<%@ Page Title="Home Page" Theme="Theme1" Language="C#" MasterPageFile="~/Site.master" AutoEventWireup="true" CodeFile="Default.aspx.cs" Inherits="_Default" %>
<asp:Content ID="HeaderContent" runat="server" ContentPlaceHolderID="HeadContent"></asp:Content>
<asp:Content ID="BodyContent" runat="server" ContentPlaceHolderID="MainContent">
<asp:Label ID="Label1" SkinID="bgSilver" EnableTheming="false" runat="server"
Text="Named Skin"></asp:Label>
<br />
<br />
<asp:Label ID="Label2" SkinID="bgBlue" runat="server" Text="Named Skin"></asp:Label>
<br />
<br />
<asp:Label ID="Label3" runat="server" Text="Default Skin"></asp:Label>
</asp:Content>
Output:
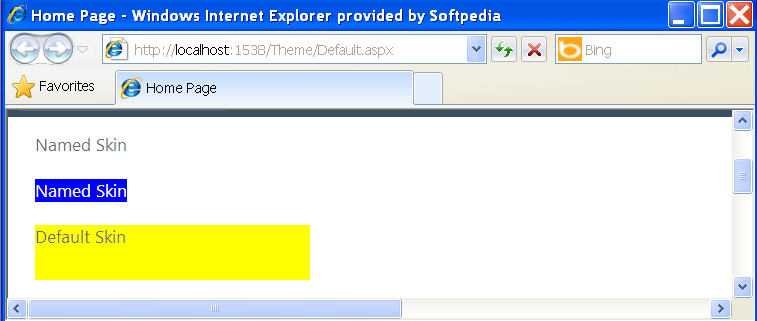
Figure 5
Apply Disabling Theme on page
You can also disable page using EnableTheme attribute in <%@ Page%> directive.
Default.aspx
<%@ Page Title="Home Page" EnableTheming="false" Language="C#" MasterPageFile="~/Site.master" AutoEventWireup="true" CodeFile="Default.aspx.cs" Inherits="_Default" %>
<asp:Content ID="HeaderContent" runat="server" ContentPlaceHolderID="HeadContent"></asp:Content>
<asp:Content ID="BodyContent" runat="server" ContentPlaceHolderID="MainContent">
<asp:Label ID="Label1" runat="server" Text="Named Skin"></asp:Label>
<br />
<br />
<asp:Label ID="Label2" runat="server" Text="Named Skin"></asp:Label>
<br />
<br />
<asp:Label ID="Label3" runat="server" Text="Default Skin"></asp:Label>
</asp:Content>
Output:
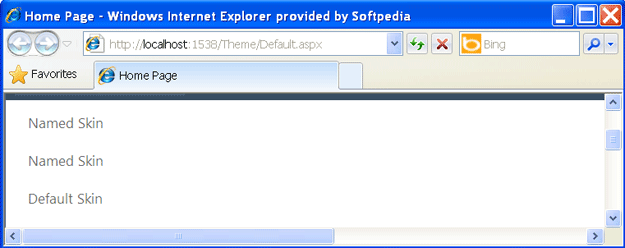
Figure 6
Applying Theme on page using Web.config file
You can apply theme using Web.config file, see the below Web.config file.
Web.config
<?xml version="1.0"?>
<configuration>
<system.web>
<pages theme="Theme1"/>
</system.web>
</configuration>
Default.aspx
<%@ Page Title="Home Page" Language="C#" MasterPageFile="~/Site.master" AutoEventWireup="true" CodeFile="Default.aspx.cs" Inherits="_Default" %>
<asp:Content ID="HeaderContent" runat="server" ContentPlaceHolderID="HeadContent"></asp:Content>
<asp:Content ID="BodyContent" runat="server" ContentPlaceHolderID="MainContent">
<asp:Label ID="Label1" SkinID="bgSilver" runat="server" Text="Named Skin"></asp:Label>
<br />
<br />
<asp:Label ID="Label2" SkinID="bgBlue" runat="server" Text="Named Skin"></asp:Label>
<br />
<br />
<asp:Label ID="Label3" runat="server" Text="Default Skin"></asp:Label>
</asp:Content>
Output:
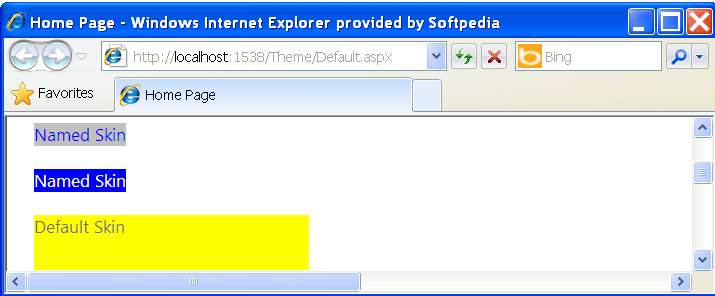
Figure 7