A SaveFileDialog control is used to save a file using Windows Save File Dialog. A typical Save File Dialog looks like Figure 1 where you can see Windows Explorer like features to navigate through folders and save a file in a folder.
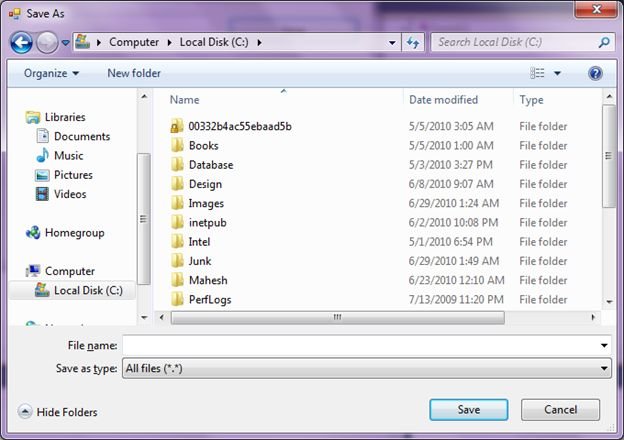
Figure 1
Creating a SaveFileDialog
We can create a SaveFileDialog control using a Forms designer at design-time or using the SaveFileDialog class in code at run-time (also known as dynamically). Unlike other Windows Forms controls, a SaveFileDialog does not have and not need visual properties like others.
Note: Even though you can create a SaveFileDialog at design-time but it is easier to create a SaveFileDialog at run-time.
Design-time
To create a SaveFileDialog control at design-time, you simply drag and drop a SaveFileDialog control from Toolbox to a Form in Visual Studio. After you drag and drop a SaveFileDialog on a Form, the SaveFileDialog looks like Figure 2.

Figure 2
Adding a SaveFileDialog to a Form adds following two lines of code.
Friend WithEvents SaveFileDialog1 As System.Windows.Forms.SaveFileDialog
Me.SaveFileDialog1 = New System.Windows.Forms.SaveFileDialog()
Run-time
Creating a SaveFileDialog control at run-time is merely a work of creating an instance of SaveFileDialog class, set its properties and add SaveFileDialog class to the Form controls.
First step to create a dynamic SaveFileDialog is to create an instance of SaveFileDialog class. The following code snippet creates a SaveFileDialog control object.
Dim saveFileDialog1 As New SaveFileDialog
ShowDialog method displays the SaveFileDialog.
saveFileDialog1.ShowDialog()
Once the ShowDialog method is called, you can browse and select a file.
Setting SaveFileDialog Properties
After you place a SaveFileDialog control on a Form, the next step is to set properties.
The easiest way to set properties is from the Properties Window. You can open Properties window by pressing F4 or right click on a control and select Properties menu item. The Properties window looks like Figure 3.
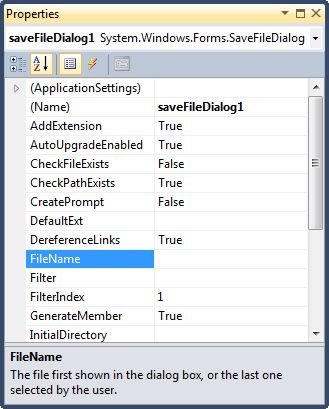
Figure 3
Initial and Restore Directories
InitialDirectory property represents the directory to be displayed when the open file dialog appears first time.
SaveFileDialog1.InitialDirectory = @"C:\"
If RestoreDirectory property set to true that means the open file dialog box restores the current directory before closing.
SaveFileDialog1.RestoreDirectory = True
Title
Title property is used to set or get the title of the open file dialog.
SaveFileDialog1.Title = "Browse Text Files"
Default Extension
DefaultExtn property represents the default file name extension.
SaveFileDialog1.DefaultExt = "txt"
Filter and Filter Index
Filter property represents the filter on an open file dialog that is used to filter the type of files to be loaded during the browse option in an open file dialog. For example, if you need users to restrict to image files only, we can set Filter property to load image files only.
SaveFileDialog1.Filter = "txt files (*.txt)|*.txt|All files (*.*)|*.*"
FilterIndex property represents the index of the filter currently selected in the file dialog box.
SaveFileDialog1.FilterIndex = 2
Check File Exists and Check Path Exists
CheckFileExists property indicates whether the dialog box displays a warning if the user specifies a file name that does not exist. CheckPathExists property indicates whether the dialog box displays a warning if the user specifies a path that does not exist.
SaveFileDialog1.CheckFileExists = True
SaveFileDialog1.CheckPathExists = True
File Name and File Names
FileName property represents the file name selected in the open file dialog.
textBox1.Text = SaveFileDialog1.FileName
If MultiSelect property is set to true that means the open file dialog box allows multiple file selection. The FileNames property represents all the files selected in the selection.
this.SaveFileDialog1.Multiselect = True
SaveFileDialog1.FileNames
Sample Example
The following code snippet is the code for Save button click event handler. Once a text file is selected, the name of the text file is displayed in the TextBox.
Private Sub SaveButton_Click(ByVal sender As System.Object, _
ByVal e As System.EventArgs) Handles SaveButton.Click
Dim saveFileDialog1 As New SaveFileDialog
saveFileDialog1.InitialDirectory = "C:\"
saveFileDialog1.Title = "Save text Files"
saveFileDialog1.CheckFileExists = True
saveFileDialog1.CheckPathExists = True
saveFileDialog1.DefaultExt = "txt"
saveFileDialog1.Filter = "Text files (*.txt)|*.txt|All files (*.*)|*.*"
saveFileDialog1.FilterIndex = 2
saveFileDialog1.RestoreDirectory = True
If (saveFileDialog1.ShowDialog() = DialogResult.OK) Then
TextBox1.Text = saveFileDialog1.FileName
End If
End Sub
Summary
A SaveFileDialog control allows users to launch Windows Save File Dialog and let them save files. In this article, we discussed how to use a Windows Save File Dialog and set its properties in a Windows Forms application.