Microsoft .NET is Microsoft's recent released development framework. Microsoft .NET not only introduces powerful languages such as C# and VB.NET, it also brings relief to other programmers including graphics, multimedia, web development and speech.
In this article, we'll see basics of GDI+ and how GDI+ is much better interface than its predecessor GDI.
GDI - Graphic User Interface.
GDI stands for Graphic Device Interface. In Microsoft Windows, GDI is a way to work with paining graphic objects such as painting on windows, forms or other media.
Why do you need GDI? To write GUI application, you need to write some kind of visual interface in the form of windows and controls. There is only one way to see the visual interface - through hardware, such as printer and monitor.
GDI is a set of C++ classes, which provides functionality to render data to a program to hardware devices with the help of device drivers. GDI sits between the program and the hardware and transfer data from one to other.
Working with GDI objects in earlier versions of Microsoft products was a pain. I've been programming with Microsoft products (C++ and VB) for over 5 years in C++ and I know the pain of using GDI. If you've ever programmed in C++ or MFC, I bet you must be frustrated using GDI objects too. Have you ever try changing color or font of windows and controls in C++/MFC?
For example, if you want to change the font of a control in C++ (MFC), you need to create a font with its type and then call SetFont. See fig. 1.1.
CStatic *lpLabel=(CStatic *)GetDlgItem(IDC_STATIC1);
CFont LabelFont;
LabelFont.CreateFont(20,20,0,0,FW_BOLD,FALSE,FALSE,0,DEFAULT_CHARSET,
OUT_CHARACTER_PRECIS,CLIP_CHARACTER_PRECIS,DEFAULT_QUALITY, DEFAULT_PITCH,NULL);
lpLabel->SetFont(&LabelFont,TRUE);
Fig 1.1.
This is just a simple example. What if you want to change the background color of a toolbar? That's more pain. You need to override OnEraseBackground and get pDC object and so on.
GDI+: A Higher Level API
In Visual Studio .NET, Microsoft has taken care of most of the GDI problems and have made it easy to use. The GDI version of .NET is called GDI+.
GDI+ is next evolution of GDI. It's much better improved and easy to use version of GDI. The best thing about GDI is you don't need to know any details of drivers to render data on printers and monitors. GDI+ takes care of it for you. In other words, GDI was a low-middle level of programming API, where you need to know about devices too, while GDI+ is a higher level of programming model, which provides functions to do work for you.
For example, if you want to set background or foreground color of a control, just set ForeGroundColor property of the control. We'll see this all in more depth later in this tutorial.
What's new in GDI+?
Beside the fact that GDI+ API is easier and flexible than GDI, there are many more new features added to the API. Some of the new features GDI+ offers are -
- Improved Colors. Now GDI+ comes with more colors and these are compatible with other colors such as Windows etc.
- Antialiasing support
- Gradient brushes
- Splines
- Transformation and Matrices
- Scalable reasons
- Alpha Blending
It's hard to cover every thing in this article, but may be in next article of this series, I would cover some of these details.
What this article covers?
In this article, first we'll talk about GDI+ classes (also called types in .NET) and interfaces followed by GDI+ objects and then we'll see some sample examples.
GDI+ Class and Interfaces in .NET
In Microsoft .NET library, all classes (types) are grouped in namespaces. A namespace is nothing but a category of similar kind of classes. For example, Forms related classes are stored in Windows.Forms namespace, database related classed are grouped in Data and its sub namespaces such as System.Data.SqlClient, System.Data.OleDb, and System.Data.Common. Similarly, GDI+ classes are grouped under six namespaces, which reside in System.Drawing.dll assembly.
GDI+ Namespaces
GDI+ is defined in the Drawing namespace and its five sub namespaces. All drawing code resides in System.Drawing.DLL assembly. These namespaces System.Drawing, System.Drawing.Design, System.Drawing.Printing, System.Drawing.Imaging, System.Drawing.Drawing2D and System.Drawing.Text namespaces.
Now let's take a quick overview of these namespaces.
System.Drawing Namespace
The System.Drawing namespace provides basic GDI+ functionality. If contains the definition of basic classes such as Brush, Pen, Graphics, Bitmap, Font etc. The Graphics class plays a major role in GDI+ and contains methods for drawing to the display device. The following table contains some of the System.Drawing namespace classes, structures and their definition.
Classes
| Classes |
Description |
| Bitmap, Image |
Bitmap and image classes. |
| Brush, Brushes |
Brush classes used define objects to fill GDI objects such as rectangles, ellipses, pies, polygons, and paths. |
| Font,FontFamily |
Defines a particular format for text, including font face, size, and style attributes. Not inheritable. |
| Graphics |
Encapsulates a GDI+ drawing surface. Not inheritable. |
| Pen |
Defines an object used to draw lines and curves. Not inheritable. |
| SolidBrush, TextureBrush |
Defines a brush of a single color. Brushes are used to fill graphics shapes, such as rectangles, ellipses, pies, polygons, and paths. Not inheritable. |
Structures
| Structure |
Description |
| Color |
Represents an ARGB color. |
| Point, PointF |
Represents a 2D x- and y-coordinates. Point takes x, y values as a number. You can use PointF if you want to use floating number values. |
| Rectangle, RectangleF |
Represents a rectangle with integer values. A rectangle represents two point pair â€" top, left and bottom, right. You can use floating values in RectangleF. |
| Size |
Size of a rectangular region with an ordered pair of width and height. Size takes an integer as width and height while SizeF takes floating numbers to represent width and height.
|
System.Drawing.Design Namespace
The System.Drawing.Design namespace is somewhat smaller in compare to the System.Drawing. It xtends design-time user interface (UI) logic and drawing functionality and provides classes for customizing toolbox and editor classes. For beginners there is nothing in this namespace. At present (.NET Beta 2) it has two types of classes -
Editor Classes
BitmapEditor, FontEditor, and ImageEditor are the editor classes. You can use these classes to extend the functionality and provide an option in properties window to edit images and fonts.
ToolBox Classes
ToolBoxItem, ToolBoxItemCollection are two major toolbox classes. By using these classes you can extend the functionality of toolbox and provide the implementation of toolbox items.
System.Drawing.Drawing2D Namespace
This namespace consists classes and enumerations for advanced 2-dimmensional and vector graphics functionality. It contains classes for gradient brushes, matrix and transformation and graphics path. Some of the common classes and enumerations are defined in the following tables -
Classes
| Class |
Description |
| Blend and ColorBlend |
These classes define the blend for gradient brushes. The ColorBlend defines array of colors and position for multi-color gradient. |
| GraphicsPath |
This class represents a set of connected lines and curves. |
| HatchBrush |
A brush with hatch style, a foreground color, and a background color. |
| LinearGradientBrush |
Provides a brush functionality with linear gradient. |
| Matrix |
3x3 matrix represents geometric transformation. |
Enumerations
| Enumeration |
Description |
| CombineMode |
Different clipping types |
| CompositingQuality |
The quality of compositing |
| DashStyle |
The style of dashed lines drawn with a Pen. |
| HatchStyle |
Represents different patterns available for HatchBrush |
| QualityMode |
Specifies the quality of GDI+ objects. |
| SmoothingMode |
Specifies the quality of GDI+ objects. |
System.Drawing.Imaging Namespace
This namespace provides advanced GDI+ imaging functionality. It defines classes for metafile images. Other classes are encoder and decoder, which let you use any image format. It also defines a class PropertyItem, which let you store and retrieve information about the image files.
System.Drawing.Printing Namespace
The System.Drawing.Printing namespace defines classes for printing functionality in your applications. Some of its major classes are defines in the following table -
Classes
| Class |
Description |
| PageSettings |
Page settings |
| PaperSize |
Size of a paper. |
| PreviewPageInfo |
Print preview information for a single page. |
| PrintController |
Controls document printing |
| PrintDocument |
Sends output to a printer. |
| PrinterResolution |
Sets resolution of a printer. |
| PrinterSettings |
Printer settings |
System.Drawing.Text Namespace
Even though most of the font's functionality is defined in System.Drawing namespace, this provides advanced typography functionality such as creating collection of fonts. Right now, this class has only three classes - FontCollection, InstalledFontCollection, and PrivateFontCollection. As you can see all of these classes are self-explanatory.
The Graphics Class
The Graphics class is center of all GDI+ classes. After discussing graphics class, I'll discuss some common GDI+ objects and their representation and then we'll see some sample applications to apply this theory in our applications and how it works.
The Graphics class plays a vital role in GDI+. No matter where you go, you go through this class. The Graphics class encapsulates GDI+ drawing surfaces. Before drawing any object (for example circle, or rectangle ) we have to create a surface using Graphics class.
There're different of ways to get a graphics object in your application. You can either get a graphics object on your form's paint event or by overriding OnPaint() method of a form. These both have one argument of type System.Windows.Forms.PaintEventArgs. You call its Graphics member to get the graphics object in your application. For example:
Protected Overrides Sub OnPaint(ByVal e As System.Windows.Forms.PaintEventArgs)
Dim g As Graphics = e.Graphics
End Sub
Now you've the Graphics object. Now you can do any thing you want. The Graphics class has tons of methods to drawing graphics objects such as fonts, pens, lines, path and polygons, images and ellipse and so on. Some of the graphics class members are described in the following table -
| DrawArc |
This method draws an arc. |
| DrawBezier,DrawBeziers, DrawCurve |
These methods draw a simple and bazier curves. These curvers can be closed, cubic and so on. |
| DrawEllipse |
Draws an ellipse or circle. |
| DrawImage |
Draws an image. |
| DrawLine |
Draws a line. |
| DrawPath |
Draws the path (lines with GraphicsPath ) |
| DrawPie |
Draws the outline of a pie section. |
| DrawPolygon |
Draws the outline of a polygon. |
| DrawRectangle |
Draws the outline of a rectangle. |
| DrawString |
Draws a string. |
| FillEllipse |
Fills the interior of an ellipse defined by a bounding rectangle. |
| FillPath |
Fills the interior of a path. |
| FillPie |
Fills the interior of a pie section. |
| FillPolygon |
Fills the interior of a polygon defined by an array of points. |
| FillRectangle |
Fills the interior of a rectangle with a Brush |
| FillRectangles |
Fills the interiors of a series of rectangles with a Brush |
| FillRegion |
Fills the interior of a Region. |
Now say, if you want to draw an ellipse using the same method we've described above, you override OnPaint method and write the following code -
Protected Overrides Sub OnPaint(ByVal e As System.Windows.Forms.PaintEventArgs)
Dim g As Graphics = e.Graphics
Dim pn As Pen = New Pen(Color.Green, 10)
g.DrawLine(pn, 100, 10, 30, 10)
g.DrawEllipse(New Pen(Color.Red, 20), 20, 40, 20, 20)
End Sub
That will draw a ellipse. Before we see more samples, let's discuss some GDI+ objects.
Common Graphics Objects
The graphics objects are the objects, which you use to draw your GDI+ items such as images, lines, rectangles, and path. For example, to fill a rectangle with a color, you need a color object and type of style you want to fill such as solid, texture and so on.
There are four common GDI+ objects, which you'll be using throughout your GDI+ life to fill GDI+ items. The major objects are:
| Brush |
Used to fill enclosed surfaces with patterns, colors, or bitmaps. |
| Pen |
Used to draw lines and polygons, including rectangles, arcs, and pies |
| Font |
Used to describe the font to be used to render text |
| Color |
Used to describe the color used to render a particular object. In GDI+ color can be alpha blended |
In GDI+, each of these object is represented by a class (also called type).
The Pen Class
A pen draws a line of specified width and style. You always use Pen constructor to create a pen. The constructor initializes a new instance of the Pen class. You can initialize it with a color or brush.
Initializes a new instance of the Pen class with the specified color.
Public Sub New(Color)
Initializes a new instance of the Pen class with the specified Brush.
Public Sub New(Brush)
Initializes a new instance of the Pen class with the specified Brush and width.
Public Sub New(Brush, Single)
Initializes a new instance of the Pen class with the specified Color and Width.
Public Sub New(Color, Single)
Here is one example:
Dim pn As Pen = New Pen(Color.Blue)
Or
Dim pn As Pen = New Pen(Color.Blue, 100)
Some of its most commonly used properties are:
| Alignment |
Gets or sets the alignment for objects drawn with this Pen. |
| Brush |
Gets or sets the Brush that determines attributes of this Pen. |
| Color |
Gets or sets the color of this Pen. |
| Width |
Gets or sets the width of this Pen. |
The Color Structure
A Color structure represents an ARGB color. Here are ARGB properties of it:
| A |
Gets the alpha component value for this Color. |
| B |
Gets the blue component value for this Color. |
| G |
Gets the green component value for this Color. |
| R |
Gets the red component value for this Color. |
You can call the Color members. Each color name ( say Blue ) is a member of the Color structure. Here is how to use a Color structure:
Dim pn as Pen = new Pen( Color.Blue )
The Font Class
The Font class defines a particular format for text such as font type, size, and style attributes. You use font constructor to create a font.
Initializes a new instance of the Font class with the specified attributes.
Public Sub New(String, Single)
Initializes a new instance of the Font class from the specified existing Font and FontStyle.
Public Sub New(Font, FontStyle)
Where FontStyle is an enumeration and here are its members:
| Member Name |
Description |
| Bold |
Bold text. |
| Italic |
Italic text. |
| Regular |
Normal text. |
| Strikeout |
Text with a line through the middle. |
| Underline |
Underlined text. |
There are tons of more overloaded constructors. Discussing all of them is out of scope of this article.
Here is one example:
Dim fnt as Font = new Font("Times New Roman", 26)
Some of its most commonly used properties are:
| Bold |
Gets a value indicating whether this Font is bold. |
| FontFamily |
Gets the FontFamily of this Font. |
| Height |
Gets the height of this Font. |
| Italic |
Gets a value indicating whether this Font is Italic. |
| Name |
Gets the face name of this Font. |
| Size |
Gets the size of this Font. |
| SizeInPoints |
Gets the size, in points, of this Font |
| Strikeout |
Gets a value indicating whether this Font is strikeout (has a line through it). |
| Style |
Gets style information for this Font. |
| Underline |
Gets a value indicating whether this Font is underlined. |
| Unit |
Gets the unit of measure for this Font. |
The Brush Class
The Brush class is an abstract base class and cannot be instantiated. We always use its derived classes to instantiate a brush object, such as SolidBrush, TextureBrush, RectangleGradientBrush, and LinearGradientBrush.
Here is one example:
Dim lBrush as LinearGradientBrush = new LinearGradientBrush(rect, Color.Red, Color.Yellow, LinearGradientMode.BackwardDiagonal);
OR
Dim brsh as SolidBrush = new SolidBrush(Color.Red), 40, 40, 140, 140)
The SolidBrush class defines a brush made up of a single color. Brushes are used to fill graphics shapes such as rectangles, ellipses, pies, polygons, and paths.
The TextureBrush encapsulates a Brush that uses an fills the interior of a shape with an image.
The LinearGradiantBrush encapsulates both two-color gradients and custom multi-color gradients.
The Rectangle Structure
Public Sub New(ByVal Point, ByVal Size)
Or
Public Sub New(Integer, Integer, Integer, Integer)
The Rectangle structure is used to draw a rectangle on WinForms. Besides its constructor, the Rectangle structure has following members:
| Bottom |
Gets the y-coordinate of the lower-right corner of the rectangular region defined by this Rectangle. |
| Height |
Gets or sets the width of the rectangular region defined by this Rectangle. |
| IsEmpty |
Tests whether this Rectangle has a Width or a Height of 0. |
| Left |
Gets the x-coordinate of the upper-left corner of the rectangular region defined by this Rectangle. |
| Location |
Gets or sets the coordinates of the upper-left corner of the rectangular region represented by this Rectangle. |
| Right |
Gets the x-coordinate of the lower-right corner of the rectangular region defined by this Rectangle. |
| Size |
Gets or sets the size of this Rectangle. |
| Top |
Gets the y-coordinate of the upper-left corner of the rectangular region defined by this Rectangle. |
| Width |
Gets or sets the width of the rectangular region defined by this Rectangle. |
| X |
Gets or sets the x-coordinate of the upper-left corner of the rectangular region defined by this Rectangle. |
| Y |
Gets or sets the y-coordinate of the upper-left corner of the rectangular region defined by this Rectangle. |
Its constructor initializes a new instance of the Rectangle class. Here is the definition:
Public Sub New(Integer, Integer, Integer, Integer)
The Point Structure
This structure is similar to the POINT structure in C++. It represents an ordered pair of x and y coordinates that define a point in a two-dimensional plane. The member x represents the x coordinates and y represents the y coordinates of the plane.
Here is how to instantiate a point structure:
Dim pt1 As Point = New Point(30, 30)
Dim pt2 As Point = New Point(110, 100)
Some sample Examples:
Adding reference to the namespaces
Before using GDI+ classes in your application, you need to add the corresponding namespace reference to the application. In my application, I use the following namespace to the application.
Imports System
Imports System.Drawing
Imports System.Drawing.Drawing2D
Invalidate Method
The Invalidate() method plays a major role in the case when you need to call OnPaint or Paint_Event method programmatically. In our application, we call Invalidate in many cases, You'll see in more details later in this article.
Draw a rectangle
You can override OnPaint event of your form to draw an rectangle. The LinearGradientBrush encapsulates a brush and linear gradient.
Dim rect As Rectangle = New Rectangle(50, 30, 100, 100)
Dim lBrush As LinearGradientBrush = New LinearGradientBrush(rect, Color.Red, Color.Yellow, LinearGradientMode.BackwardDiagonal) g.FillRectangle(lBrush, rect)}
Draw an Arc
DrawArc function draws an arc. This function takes four arguments.
First is the Pen. You create a pen by using the Pen class. The Pen constructor takes at least one argument, the color or the brush of the pen. Second argument width of the pen or brush is optional.
Dim pn As Pen = New Pen(Color.Blue)
Or
Dim pn s Pen = new Pen( Color.Blue, 100 );
The second argument is a rectangle. You can create a rectangle by using Rectangle structure. The Rectangle constructor takes four int type arguments and they are left and right corners of the rectangle.
Dim rect As Rectangle = New Rectangle(50, 50, 200, 100)
Dim pn As Pen = New Pen(Color.Blue)
Dim rect As Rectangle = New Rectangle(50, 50, 200, 100)
g.DrawArc(pn, rect, 12, 84)
Draw a Line
DrawLine function of the Graphics class draws a line. It takes three parameters, a pen, and two Point class parameters, starting and ending points. Point class constructor takes x, y arguments.
Dim pn As Pen = New Pen(Color.Blue)
Dim rect As Rectangle = New Rectangle(50, 50, 200, 100)
Dim pt1 As Point = New Point(30, 30)
Dim pt2 As Point = New Point(110, 100)
g.DrawLine(pn, pt1, pt2)
Draw an Ellipse
An ellipse( or a circle) can be drawn by using DrawEllipse method. This method takes only two parameters, Pen and rectangle.
protected override void OnPaint(PaintEventArgs pe)
{
Dim pn As Pen = New Pen(Color.Blue, 100)
Dim rect As Rectangle = New Rectangle(50, 50, 200, 100)
g.DrawEllipse(pn, rect)
}
Gradient
Drawing bazier curves is little more complex than other objects.
protected override void OnPaint(PaintEventArgs pe) {
Dim rect As Rectangle = New Rectangle(50, 30, 200, 200)
Dim lBrush As LinearGradientBrush = New LinearGradientBrush(rect, Color.Blue, Color.Green, LinearGradientMode.Vertical)
g.FillRectangle(lBrush, rect)
}
Draw a Text
You can override OnPaint event of your form to draw an rectangle. The LinearGradientBrush encapsulates a brush and linear gradient.
protected override void OnPaint(PaintEventArgs pe) {
g.DrawString("Welcome to the Graphics World", Me.Font, New SolidBrush
Color.Red), 20, 20)
}
Some Sample Project
This sample application is a Windows application developed in VS.NET Beta 2. The output of the application looks like the below figure.
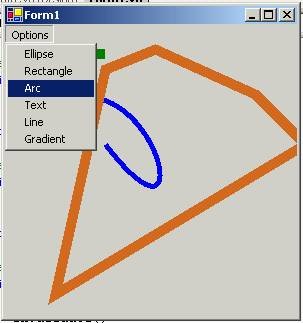
The menu options draw different GDI+ objects on the form. For example, if you click rectangle menu item, it draws a rectangle.
Source code is listed here -
Imports System
Imports System.Drawing
Imports System.Drawing.Drawing2D
Public Class Form1
Inherits System.Windows.Forms.Form
Dim imgType As Integer = 0
#Region " Windows Form Designer generated code "
' code generated by designer here
#End Region
Protected Overrides Sub OnPaint(ByVal e As System.Windows.Forms.PaintEventArgs)
Dim g As Graphics = e.Graphics
If imgType = 1 Then
Dim pn As Pen = New Pen(Color.Blue, 100)
Dim rect As Rectangle = New Rectangle(50, 50, 200, 100)
g.DrawEllipse(pn, rect)
End If
If imgType = 2 Then
Dim rect As Rectangle = New Rectangle(50, 30, 100, 100)
Dim lBrush As LinearGradientBrush = New LinearGradientBrush(rect, Color.Red, Color.Yellow, LinearGradientMode.BackwardDiagonal)
g.FillRectangle(lBrush, rect)
End If
If imgType = 3 Then
Dim pn As Pen = New Pen(Color.Blue)
Dim rect As Rectangle = New Rectangle(50, 50, 200, 100)
g.DrawArc(pn, rect, 12, 84)
End If
If imgType = 4 Then
g.DrawString("Welcome to the Graphics World", Me.Font, New SolidBrush(Color.Red), 20, 20)
End If
If imgType = 5 Then
Dim pn As Pen = New Pen(Color.Blue)
Dim rect As Rectangle = New Rectangle(50, 50, 200, 100)
Dim pt1 As Point = New Point(30, 30)
Dim pt2 As Point = New Point(110, 100)
g.DrawLine(pn, pt1, pt2)
End If
If imgType = 6 Then
Dim rect As Rectangle = New Rectangle(50, 30, 200, 200)
Dim lBrush As LinearGradientBrush = New LinearGradientBrush(rect, Color.Blue, Color.Green, LinearGradientMode.Vertical)
g.FillRectangle(lBrush, rect)
End If
If imgType = 0 Then
Dim pn As Pen = New Pen(Color.Green, 10)
g.DrawLine(pn, 100, 10, 30, 10)
g.DrawEllipse(New Pen(Color.Red, 20), 20, 40, 20, 20)
g.DrawBezier(New Pen(Color.Blue, 5), New Point(50, 60), New Point(150, 10), New Point(200, 230), New Point(100, 100))
Dim point1 As PointF = New PointF(50.0F, 250.0F)
Dim point2 As PointF = New PointF(100.0F, 25.0F)
Dim point3 As PointF = New PointF(150.0F, 5.0F)
Dim point4 As PointF = New PointF(250.0F, 50.0F)
Dim point5 As PointF = New PointF(300.0F, 100.0F)
Dim curvePoints As PointF() = {point1, point2, point3, point4, point5}g.DrawPolygon(New Pen(Color.Chocolate, 10), curvePoints)
End If
End Sub
' ellipse
Private Sub MenuItem2_Click(ByVal sender As System.Object, ByVal e As System.EventArgs) Handles MenuItem2.Click
imgType = 1
Invalidate()
End Sub
'rectangle
Private Sub MenuItem3_Click(ByVal sender As System.Object, ByVal e As System.EventArgs) Handles MenuItem3.Click
imgType = 2
Invalidate()
End Sub
' arc
Private Sub MenuItem4_Click(ByVal sender As System.Object, ByVal e As System.EventArgs) Handles MenuItem4.Click
imgType = 3
Invalidate()
End Sub
'text
Private Sub MenuItem5_Click(ByVal sender As System.Object, ByVal e As System.EventArgs) Handles MenuItem5.Click
imgType = 4
Invalidate()
End Sub
'line
Private Sub MenuItem6_Click(ByVal sender As System.Object, ByVal e As System.EventArgs) Handles ine.Click
imgType = 5
Invalidate()
End Sub
'gradient
Private Sub MenuItem7_Click(ByVal sender As System.Object, ByVal e As System.EventArgs) Handles MenuItem7.Click
imgType = 6
Invalidate()
End Sub
End Class