Event Handling in windows programming using VB.NET
In this article I will explain you about Event Handling in windows programming using VB.NET.
Event handling is performed differently in VB.NET than it is in Visual C++. In Visual C++, each control is derived from CWnd and a message map handles any events. The message map concept doesn't exist in VB.NET. The Control class, or any derived class, has virtual functions, which can be overridden to raise an event. Therefore, a Form class can use any event handler in its hierarchy. For example, the Control class has many event methods including GotFocus, ControlRemoved, LostFocus, and MouseWheel. Table 9.7 lists some common event-handling methods.
Table 9.7: Windows Controls Events

To override the OnPaint method, for example, add the following method to your new form or control:
Protected Overrides Sub OnPaint(ByVal e As PaintEventArgs)
' your code here
End Sub
Adding Event Handlers at Design-Time
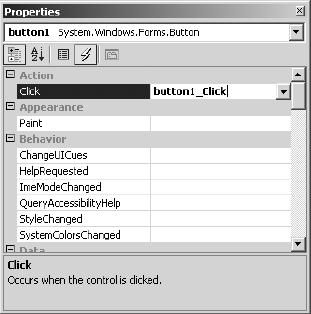
To attach events to a control at design-time, use the Properties window. Right-click the control and click the Properties menu item. Select the Events tab by pressing the lightening button at the top of the Properties window. Now, pick an event and type the corresponding function name. Alternatively, you could double-click in the field next to the event and VS.NET will choose a name for you. In Figure 9.17, we add a button click event handler as button1_Click.
This action adds a delegate to the event, which looks like the following:
Me.button1.Click += New System.EventHandler(Me.button1_Click)
The event handler method takes the following form:
Private Sub button1_Click(ByVal sender As Object, ByVal e As System.EventArgs)
End Sub
Now write whatever code, within the method, you wish to execute after the event takes place. You can use the "e" (event argument) parameter that is passed to retrieve any pertinent information about the event, such as which key was pressed. The sender parameter is the control that initiated the event, in this case, the button1 member.
Handling Mouse Events
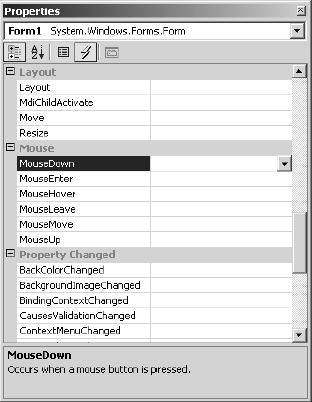
The window in Figure 9.18 lists multiple mouse events. Event handlers can be generated simply by double-clicking the desired event.
To test the sample code that follows, create a Windows application and write the OnMouseDown and OnMouseMove event handlers in the InitializeComponent method.
Me.MouseDown += New System.Windows.Forms.MouseEventHandler(Me.OnMouseDown)
Me.MouseMove += New System.Windows.Forms.MouseEventHandler(Me.OnMouseMove)
The preceding code results in the OnMouseDown method being called if a mouse button is pressed and the OnMouseMove method being called whenever the mouse moves over the control, which in this case is the form.
To carry out some action after the mouse event occurs, we need to write the event handlers. The second parameter of the event handler method is a System.WinForms.MouseEventArgs object, which details the mouse's state. The MouseEventArgs' members are listed in Table 9.8.

Listing 9.7 shows the event handler code for the MouseDown and MouseMove events.
Listing 9.7: Mouse Event Handlers
Public Sub OnMouseDown(ByVal sender As Object, ByVal e As System.Windows.Forms.MouseEventArgs)
Select Case e.Button
Case MouseButtons.Left
MessageBox.Show(Me, "Left Button Click")
Exit Select
Case MouseButtons.Right
MessageBox.Show(Me, "Right Button Click")
Exit Select
Case MouseButtons.Middle
Exit Select
Case Else
Exit Select
End Select
End Sub
Private Sub OnMouseMove(ByVal sender As Object, ByVal e As System.Windows.Forms.MouseEventArgs)
Me.Text = "Mouse Position:" & e.X.ToString() & "," & e.Y.ToString()
End Sub
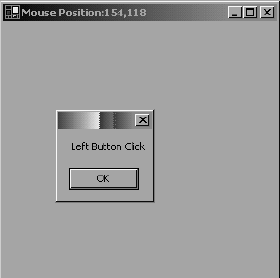
Figure 9.19 shows the output of Listing 9.7. A mouse click displays, in a message box, the mouse button clicked, while a mouse move shows the mouse's coordinates as the title of the form.
Conclusion
Hope this article would have helped you in understanding Event Handling in windows programming using VB.NET.