Once you have the surface, pens, and/or brushes, you can draw lines, shapes, curves or images. The Graphics class provides draw and fill methods to draw and fill graphics shapes, curves, or images. For example, the FillRectangle method draws a rectangle with a filled color, and Draw Rectangle draws the boundary of a rectangle with the specified pen. Draw methods take a pen as an argument, and fill methods take a brush.
We override the OnPaint method and write the code in Listing 2.1 on this method. As Listing 2.1 shows, we first set the smoothing mode of the Graphics object by setting its SmoothingMode property. The SmoothingMode enumeration is defined in the System.Drawing.Advanced2D namespace and is used to set the quality of a graphics object. In our code, we set the smoothing mode to anti-aliasing.
After that we create a rectangle, two pens, and a solid brush. In the next code snippet, we call the DrawRectangle, FillEllipse, and DrawLine methods. The DrawRectangle method draws the boundaries of a rectangle, the FillEllipse method fills an ellipse with the specified brush, and the DrawLine method draws a line using the specified pen.
LISTING 2.1: Drawing lines, rectangles, and ellipses
Protected Overloads Overrides Sub OnPaint(ByVal e As PaintEventArgs)
'Obtain the Graphics object
Dim g As Graphics = e.Graphics
'Set the smoothing mode of the surface
'Create a rectangle with height 100 and width 100
Dim rect As New Rectangle(20, 20, 100, 100)
' Create two Pen objects, one red and one black
Dim redPen As New Pen(Color.Red, 3)
Dim blackPen As Pen = Pens.Black
'Create a SolidBrush object
Dim greenBrush As New SolidBrush(Color.Green)
'Draw shapes and lines
g.DrawRectangle(redPen, rect)
g.FillEllipse(greenBrush, rect)
g.DrawLine(blackPen, 0, 250, Me.Width, 250)
g.FillEllipse(Brushes.Blue, 70, 220, 30, 30)
g.FillEllipse(Brushes.SkyBlue, 100, 210, 40, 40)
g.FillEllipse(Brushes.Green, 140, 200, 50, 50)
g.FillEllipse(Brushes.Yellow, 190, 190, 60, 60)
g.FillEllipse(Brushes.Violet, 250, 180, 70, 70)
g.FillEllipse(Brushes.Red, 320, 170, 80, 80)
End Sub
Releasing Objects
When you are done using objects, you must release them. In the .NET Framework library, most objects provide a Dispose method, which can be used to dispose of an object. This Dispose method makes sure that all resources allocated for an object are released.
The following code snippet creates Pen and SolidBrush objects as redPen and greenBrush, respectively:
Dim redPen As New Pen(Color.Red, 3)
Dim greenBrush As New SolidBrush(Color.Green)
When you are done with these objects, call the Dispose method to release the resources allocated with them. For example, the following code snippet disposes of the redPen and greenBrush objects:
RedPen.Dispose()
Green.Brush.Dispose()
Now we will Dispose of the previously create objects using the Dispose methods to the objects we create in Listing 2.1, as show in Listing 2.2 (Boldface lines are the new lines added to the listing.)
LISTING 2.2: Using Dispose calls
Protected Overloads Overrides Sub OnPaint(ByVal e As PaintEventArgs)
'Obtain the Graphics object
Dim g As Graphics = e.Graphics
'Set the composite quality and smoothing mode of the surface
'Create a rectanlge from point (20,20) to (100,100)
Dim rect As New Rectangle(20, 20, 100, 100)
'Create two Pen objects, one red and one black
Dim redPen As New Pen(Color.Red, 3)
Dim blackPen As Pen = Pens.Black
'Create a SolidBrush object
Dim greenBrush As New SolidBrush(Color.Green)
'Draw shapes and lines
g.DrawRectangle(redPen, rect)
g.FillEllipse(greenBrush, rect)
g.DrawLine(blackPen, 0, 250, Me.Width, 250)
g.FillEllipse(Brushes.Blue, 70, 220, 30, 30)
g.FillEllipse(Brushes.SkyBlue, 100, 210, 40, 40)
g.FillEllipse(Brushes.Green, 140, 200, 50, 50)
g.FillEllipse(Brushes.Yellow, 190, 190, 60, 60)
g.FillEllipse(Brushes.Violet, 250, 180, 70, 70)
g.FillEllipse(Brushes.Red, 320, 170, 80, 80)
'Dispose of objects
greenBrush.Dispose()
'blackPen.Dispose();
redPen.Dispose()
g.Dispose()
End Sub
Disposing of Objects
In the .NET Framework, the garbage collector is responsible for managing resources associated with an object. When you dispose of an object, the garbage collector collects the object right away and frees all the resources associated with that object. If you don't dispose of an object, the garbage collector will keep track of the objects, and if an object is not used for a certain amount of time, it will dispose of it automatically.
It is always best programming practice to dispose of any object that you create explicitly (using the new operator).
Building and Running the application
The final step in creating an application is to build and run it. To do this, in Visual Studio .NET you can simply select Debug | Start (F5) or Debug | Start Without Debugging (Ctrl+F5).
The output of the application looks like Figure 2.9. The application draw a line, a rectangle, and some ellipses with different with different colors.
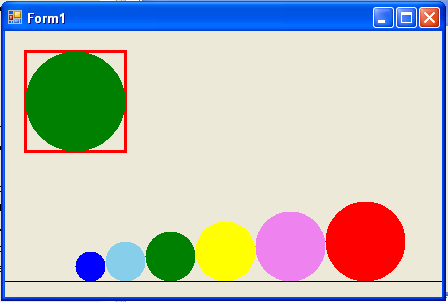
FIGURE 2.9 Your First GDI+ Application
Source Code
Source code attach in the top of the article.
Conclusion
Congratulations! You have finished the first step toward becoming a GDI+ expert. Now you can write simple graphics applications in Visual Studio .NET. Read my other articles on GDI+ on the website.