As promised, the examples in this article not only show the use of GDI+, but also encourage you to use GDI+ practices in real-world applications. We will create one more real-world application, a line chart application. In this example we will use all the functionality we have discussed so far. Our line chart application will draw lines when a user clicks on a form.
We create a Windows application and add a check box and a button. Then we change the Text properties of the button and the check box to call them Clear All and Rectangle, repetitively. Then we add code to draw two lines and some numbers (using the DrawString method). The initial screen of the line chart application looks like figure 3.9.
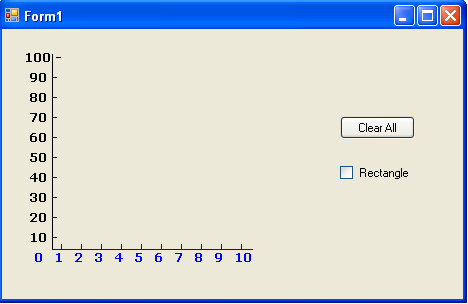
FIGURE 3.9: The line chart application.
When you click on the form, the application draws a line. The first line starts from the bottom left corner, where the values of our x- and y-axes are both 0. After a few clicks, the chart looks like Figure 3.10. Every time you click on the form, the application draws a line from the previous point to the current point and draws a small ellipse representing the current point.
The Clear All button removes the lines and initializes the first point to (0, 0). Now if you check the Rectangle box and click on the form, the chart looks like Figure 3.11. When you click the left mouse button for the first time, the application draws a line from point (0, 0) to the point where you clicked the button.
Now let's see the code. First we declare starting and ending points. These points will be used to draw a line when you click the left mouse button. The default values of both points are shown in the following code fragment, which represents position (0, 0) on the screen:
Private startPoint As New Point(50, 217)
Private endPoint As New Point(50, 217)
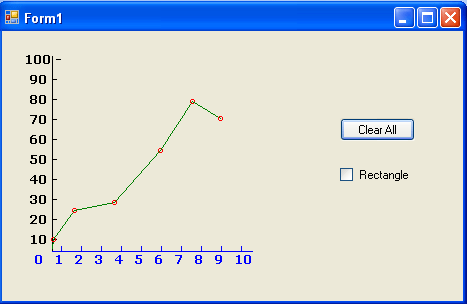
FIGURE 3.10: The line chart application with a chart
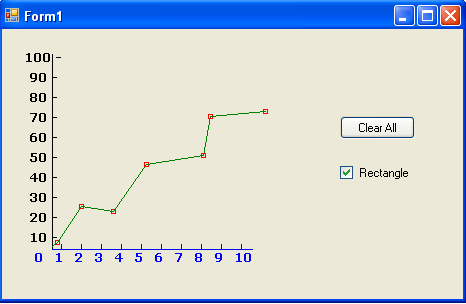
FIGURE 3.11: The line chart with rectangles to mark point
The next step is to draw vertical and horizontal axis lines with index numbers. We do this on the form's paint event handler with the help of the DrawString method. Listing 3.8 provides code for the form-paint event handler. As the listing shows, we simply draw a vertical line, a horizontal line, and the marks on these lines.
LISTING 3.8: Drawing lines and marks
Private Sub Form1_Paint(ByVal sender As System.Object, ByVal e As System.Windows.Forms.PaintEventArgs) Handles MyBase.Paint
Dim g As Graphics = e.Graphics
Dim vertFont As New Font("Verdana", 10, FontStyle.Bold)
Dim horzFont As New Font("Verdana", 10, FontStyle.Bold)
Dim vertBrush As New SolidBrush(Color.Black)
Dim horzBrush As New SolidBrush(Color.Blue)
Dim blackPen As New Pen(Color.Black)
Dim bluePen As New Pen(Color.Blue)
' Drawing a vertical and a horizontal line
g.DrawLine(blackPen, 50, 220, 50, 25)
g.DrawLine(bluePen, 50, 220, 250, 220)
' x-axis drawing
g.DrawString("0", horzFont, horzBrush, 30, 220)
g.DrawString("1", horzFont, horzBrush, 50, 220)
g.DrawString("2", horzFont, horzBrush, 70, 220)
g.DrawString("3", horzFont, horzBrush, 90, 220)
g.DrawString("4", horzFont, horzBrush, 110, 220)
g.DrawString("5", horzFont, horzBrush, 130, 220)
g.DrawString("6", horzFont, horzBrush, 150, 220)
g.DrawString("7", horzFont, horzBrush, 170, 220)
g.DrawString("8", horzFont, horzBrush, 190, 220)
g.DrawString("9", horzFont, horzBrush, 210, 220)
g.DrawString("10", horzFont, horzBrush, 230, 220)
'Draw vertical strings
Dim vertStrFormat As New StringFormat()
vertStrFormat.FormatFlags = StringFormatFlags.DirectionVertical
g.DrawString("-", horzFont, horzBrush, 50, 212, vertStrFormat)
g.DrawString("-", horzFont, horzBrush, 70, 212, vertStrFormat)
g.DrawString("-", horzFont, horzBrush, 90, 212, vertStrFormat)
g.DrawString("-", horzFont, horzBrush, 110, 212, vertStrFormat)
g.DrawString("-", horzFont, horzBrush, 130, 212, vertStrFormat)
g.DrawString("-", horzFont, horzBrush, 150, 212, vertStrFormat)
g.DrawString("-", horzFont, horzBrush, 170, 212, vertStrFormat)
g.DrawString("-", horzFont, horzBrush, 190, 212, vertStrFormat)
g.DrawString("-", horzFont, horzBrush, 210, 212, vertStrFormat)
g.DrawString("-", horzFont, horzBrush, 230, 212, vertStrFormat)
' y-axis drawing
g.DrawString("100 -", vertFont, vertBrush, 20, 20)
g.DrawString("90 -", vertFont, vertBrush, 25, 40)
g.DrawString("80 -", vertFont, vertBrush, 25, 60)
g.DrawString("70 -", vertFont, vertBrush, 25, 80)
g.DrawString("60 -", vertFont, vertBrush, 25, 100)
g.DrawString("50 -", vertFont, vertBrush, 25, 120)
g.DrawString("40 -", vertFont, vertBrush, 25, 140)
g.DrawString("30 -", vertFont, vertBrush, 25, 160)
g.DrawString("20 -", vertFont, vertBrush, 25, 180)
g.DrawString("10 -", vertFont, vertBrush, 25, 200)
' Dispose of objects
vertFont.Dispose()
horzFont.Dispose()
vertBrush.Dispose()
horzBrush.Dispose()
blackPen.Dispose()
bluePen.Dispose()
End Sub
Note:
The idea in Listing 3.8 is to show an extensive use of the DrawString method. Alternatively and preferably, you could replace DrawString with the DrawLine and / or DrawLines method.
Now on the mouse-down event handler, we draw a line from the starting point (0, 0) to the first mouse click. We store the mouse click position as the starting point for the next line. When we click again, the new line will be drawn from the current starting position to the point where the mouse was clicked. Listing 3.9 shows the mouse-down click event handler. We create a new Graphics object using the CreateGraphics method. After that we create two Pen objects. We store the previous point as the starting point and the current point as the ending point. The x and y properties of MouseEventArgs return the x- and y-values of the point where the mouse was clicked.
Now we check to see if the Rectangle check box is checked. If so, we draw a rectangle to mark the connecting point to the two lines. If not, we draw an ellipse as the connecting point.
LISTING 3.9: The mouse-down event handler
Private Sub Form1_MouseDown(ByVal sender As System.Object, ByVal e As System.Windows.Forms.MouseEventArgs) Handles MyBase.MouseDown
If e.Button = MouseButtons.Left Then
'Create a Graphics object
Dim g1 As Graphics = Me.CreateGraphics()
' Create two pens
Dim linePen As New Pen(Color.Green, 1)
Dim ellipsePen As New Pen(Color.Red, 1)
startPoint = endPoint
endPoint = New Point(e.X, e.Y)
' Draw the line from the current point
' to the new point
g1.DrawLine(linePen, startPoint, endPoint)
' If rectangle check box is checked,
' draw a rectangle to represent the point
If checkBox1.Checked Then
g1.DrawRectangle(ellipsePen, e.X - 2, e.Y - 2, 4, 4)
Else
' Draw a circle to represent the point
g1.DrawEllipse(ellipsePen, e.X - 2, e.Y - 2, 4, 4)
End If
'Dispose of objects
linePen.Dispose()
ellipsePen.Dispose()
g1.Dispose()
End If
End Sub
The Clear All button removes all the lines by invalidating the form's client are and sets the starting and ending points back to their initial values. Code for the Clear All button click handler is given in Listing 3.10.
LISTING 3.10: The Clear All button click event handler
Private Sub button1_Click(ByVal sender As Object, ByVal e As System.EventArgs)
startPoint.X = 50
startPoint.Y = 217
endPoint.X = 50
endPoint.Y = 217
Me.Invalidate(Me.ClientRectangle)
End Sub
Conclusion
Hope the article would have helped you in understanding how to draw a line chart in GDI+. Read other articles on GDI+ on the website.