Area Tag in HTML5
This <area> tag is used only within a <map> tag. <area> tag is used to define the areas on the image map that whenever user clicks on the area user will navigate to other page.
This <area> tag is used only within a <map> tag. <area> tag is used to define the areas on the image map that whenever user clicks on the area user will navigate to other page.Image map is used to divide the image into clickable areas and clickable are works like as hyperlink.
Syntax
<area
alt="alternative text"
class="class name(s)"
coords="comma-separated list of values"
dir="ltr | rtl"
href="URL"
id="unique alphanumeric identifier"
lang="language code"
nohref="nohref"
shape="circle | default | poly | rect"
target="frame or window name | _blank | _parent | _self |_top"
title="advisory text"/>
In the <area> tag there are so many element specific attributes given below:
Alt: This attribute is used only when web page can not render image and href attribute on the web page. It is used as alternative text message in place of image if image is not rendered.
Class: This attribute is used to specify a class name for an element. It associate a particular area within an image map with a CSS class.
Coords: This attribute is used to define the clickable area of any shape on the image map. It contains a set of values specifying the coordinate of the hotspot region. You can only set the area not the shape directly here, if you want to set your shape than you should use shape attribute also. Shape attribute contain rectangle shape, circle shape and polygon shape.
rect: left, top, right, bottom
circle: center-x, center-y, radius
poly: x1, y1, x2, y2,
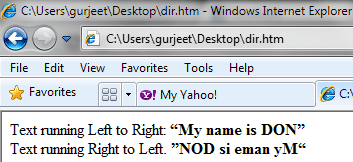
dir: this attribute is used for text direction for the content in an element.
<div>
Text running Left to Right:
<bdo dir="ltr"><b><q>My name is DON</q></b></bdo>
</div>
<div>
Text running Right to Left.
<bdo dir="rtl"><b><q>My name is DON</q></b></bdo>
</div>
Output:
href: This attribute is used for navigation. This attribute specifies the hyperlink for the area. You should must use either href attribute or nohref attribute.
hreflang: This attribute introduced by HTML5 and it is used to Specifies the language of the target URL. This attribute is used only when href attribute is used in the element.
id: This attribute is used to specify a unique id for an element.
lang: This attribute is used to specify a language code for the content in an element.
media: This attribute is used to specifies media format means what media/device the target URL is optimized for. This attribute is used only when href attribute is present. The value must be a valid media query. The default value is all.
ping: This attribute is used to specify the URL (s) that will be notified when a link is visited (when user follow the hyperlink). You can specify more than one URL (s) but that must be separated by comma. This attribute is used only when href attribute is present in element.
rel: This attribute is introduced by HTML5 and it is used to specify the relationship between current document and the destination or target URI. If you don't specify the relation then void is used. There are many value that you can use in rel attribute but using comma fro separating values.Possible values:
-
alternate
-
archives
-
author
-
bookmark
-
external
-
feed
-
first
-
help
-
index
-
last
-
license
-
next
-
nofollow
-
noreferrer
-
prev
-
search
-
sidebar
-
tag
-
up
shape: This attribute is used to define the shape for the clickable area in the image map for link. Possible values are:
default: you can specify default value also.
rect: rect value defines a rectangular region
circle: circle value defines a circular region
poly: poly value define polygon region.
target: Specifies where to open the target URL specified in href attribute.
_blank : _blank value indicates a new window must be open.
_parent: _parent value is used in the situation where a frameset file is nested inside another frameset file. A link in one of the inner frameset documents which uses "_parent" will load the new document where the inner frameset file had been.
_self:_self value indicates the frame contain the source link. It is works the same as if you had not used TARGET at all.
_top: _top value indicates that it will use full browser window.
type: This attribute is used to specify the type of media in the form of MIME type for the hyperlink.
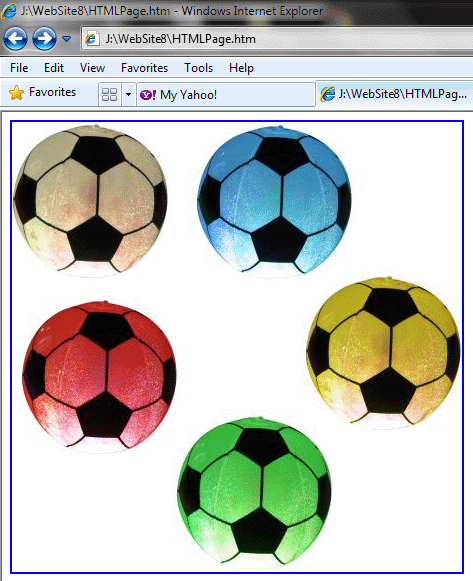
Note: One thing always remember whenever you use area tag in map tag. Your <img> tag must contain usemap value with #. If your ignore this your clickable image not work on Internet Explorer or Fire Fox, so always use # in usemap value of <img> tag.
<img src="image/all balls.jpg" style="width: 450px; height: 450px;" alt="Balls" usemap="#BallMap" />
Code:
HTMLPage.htm
<!DOCTYPE >
<html>
<head>
<title></title>
</head>
<body>
<img src="image/all balls.jpg" style="width: 450px; height: 450px;" alt="Balls" usemap="#BallMap" />
<map name="BallMap">
<area shape="circle" coords="78,81,76.5" href="white.htm" alt="white" />
<area shape="circle" coords="260,81,76.5" href="blue.htm" alt="blue" />
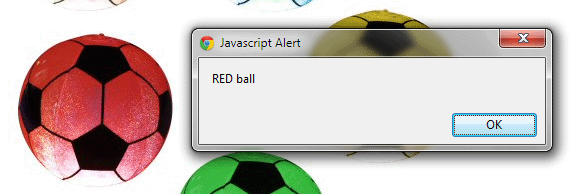
<area shape="circle" coords="84,254,76.5" href="javascript:alert('RED ball');" alt="red" />
<area shape="circle" coords="366,232,76.5" href="yellow.htm" alt="yellow" />
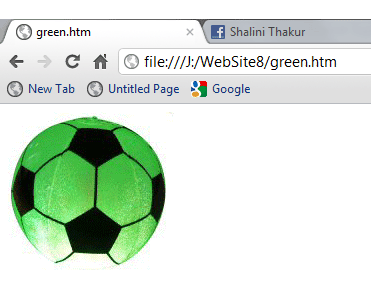
<area shape="circle" coords="238,370,76.5" href="green.htm" alt="green" />
</map>
</body>
</html>
Green.htm
<!DOCTYPE>
<html>
<head>
<title></title>
</head>
<body>
<img src="image/green.gif" alt="green" />
</body>
</html>
Red.htm
<!DOCTYPE>
<html>
<head>
<title></title>
</head>
<body>
<img src="image/red.gif" alt="red" />
</body>
</html>
Blue.htm
<!DOCTYPE >
<html >
<head>
<title></title>
</head>
<body>
<img src="image/blue-b.gif" alt="blue" />
</body>
</html>
Yellow.htm
<!DOCTYPE>
<html>
<head>
<title></title>
</head>
<body>
<img src="image/yellow.gif" alt="yellow" />
</body>
</html>
White.htm
<!DOCTYPE >
<html>
<head>
<title></title>
</head>
<body>
<img src="image/white.gif" alt="White" />
</body>
</html>
Output:
IE
Chrome
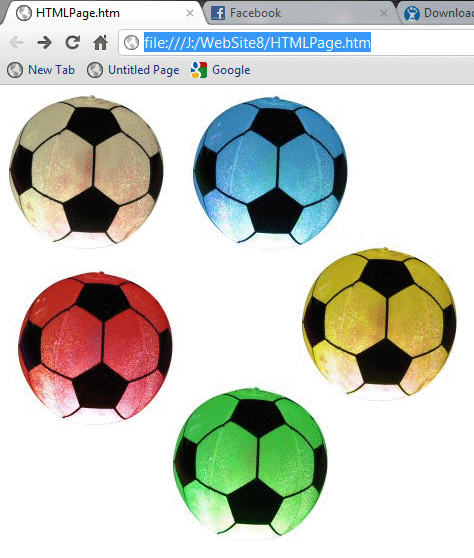
Fire Fox
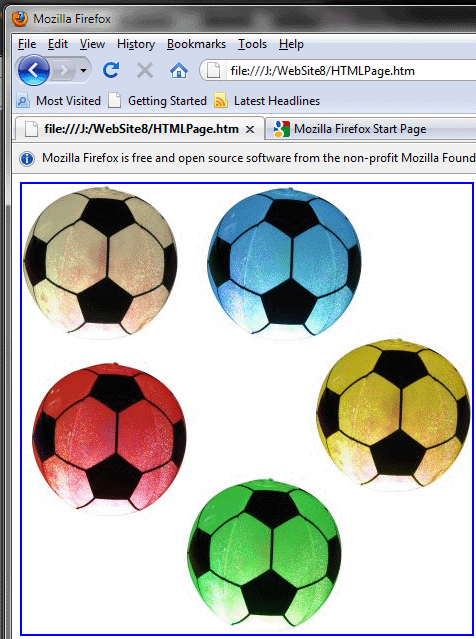
Click on green ball you will move to green.htm page.
Click on red ball you will get a message box see below figure.