Introduction:
The System.Net.Mail namespace in ASP.NET 2.0 has replaced the System.Web.Mail namespace in ASP.NET 1.x. In ASP.NET 2.0, you should know that the method of sending emails has changed slightly. Follow Brad Kingsley as he sends his first email from an ASP.NET 2.0 application.
Changes to send message in ASP.NET 20 and its previous version
In the given example the form contains five textboxes:
One button is used for sending the email. So we write the code on the button's click event.
We add the System.Net.Mail namespace for sending the email.
For Example: Through this example you can understand how to send the email in ASP.NET 2.0.
These are the following steps to help you to send email in ASP.NET 2.0.
Step 1: Open your new website.
Step 2: Design the page.
Step 3: Now add the System.Net.Mail namespace.
Step 4: Write the VB code on the button's click event.
Default.aspx:
<%@ Page Language="VB" AutoEventWireup="true" CodeFile="Default.aspx.vb" Inherits="_Default" %>
<!DOCTYPE html PUBLIC "-//W3C//DTD XHTML 1.0 Transitional//EN" "http://www.w3.org/TR/xhtml1/DTD/xhtml1-transitional.dtd">
<html xmlns="http://www.w3.org/1999/xhtml" >
<head runat="server">
<title>Email sending</title>
</head>
<body>
<form id="form1" runat="server">
<div>
<table cellpadding="10" cellspacing="0" border="2" width="40%" height="100px">
<tr>
<td valign="top" style="padding-top:20px; background-color: #ffccff;">
<asp:Label ID="Label1" runat="server" Text="To " ForeColor="Purple"> </asp:Label>
<asp:TextBox ID="T1" runat="server" BackColor="#C0FFFF"></asp:TextBox>
<br /><br />
<asp:Label ID="Label2" runat="server" Text="From" ForeColor="Purple"> </asp:Label>
<asp:TextBox ID="T2" runat="server" BackColor="#C0FFFF"></asp:TextBox><br /><br />
<asp:Label ID="Label3" runat="server" Text="Subject" ForeColor="Purple"></asp:Label>
<asp:TextBox ID="T3" runat="server" BackColor="#C0FFFF"></asp:TextBox><br /><br />
<asp:Label ID="Label4" runat="server" Text="Body" ForeColor="Purple"></asp:Label>
<asp:TextBox ID="T4" runat="server" Height="100px" Width="200px" BackColor="#C0FFFF" ForeColor="Black"></asp:TextBox><br /><br />
<asp:Label ID="Label5" runat="server" Text="List Status" ForeColor="Purple"></asp:Label>
<asp:TextBox ID="T5" runat="server" BackColor="#C0FFFF" ForeColor="Red"></asp:TextBox><br/><br />
<asp:Button ID="Send" runat="server" Text="Send" OnClick="Send_Click" BackColor="#C0C000" ForeColor="Navy" />
</td>
</tr>
</table></div>
</form>
</body>
</html>
Design view of the above page is as follows:
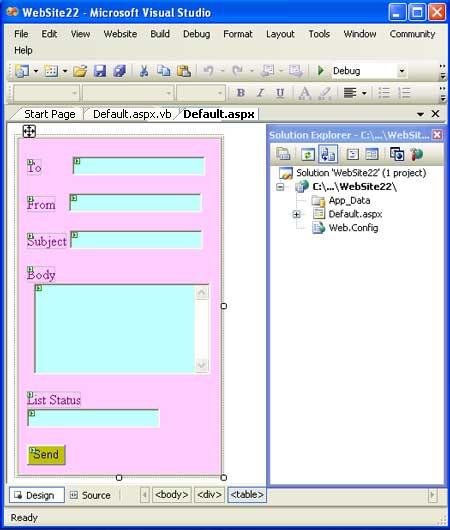
Figure 1: Design of the form.
Default.aspx.vb:
Imports System
Imports System.Data
Imports System.Configuration
Imports System.Web
Imports System.Web.Security
Imports System.Web.UI
Imports System.Web.UI.WebControls
Imports System.Web.UI.WebControls.WebParts
Imports System.Web.UI.HtmlControls
Imports System.Net.Mail
Partial Public Class _Default
Inherits System.Web.UI.Page
Protected Sub Page_Load(ByVal sender As Object, ByVal e As EventArgs)
End Sub
Protected Sub Send_Click(ByVal sender As Object, ByVal e As EventArgs)
Dim smtpclient As SmtpClient = New SmtpClient()
Dim message As MailMessage = New MailMessage()
smtpclientl.Host = "localhost"
Try
Dim SendFrom As MailAddress = New MailAddress(T1.Text)
Dim SendTo As MailAddress = New MailAddress(T2.Text)
Dim MyMessage As MailMessage = New MailMessage(SendFrom, SendTo)
MyMessage.Subject = T3.Text
MyMessage.Body = T4.Text
T5.Text = "Message Sent"
Catch ex As Exception
T5.Text = ex.ToString()
End Try
End Sub
End Class
Output: The following page will display when you debug this code. And you should fill the given entries in the form.
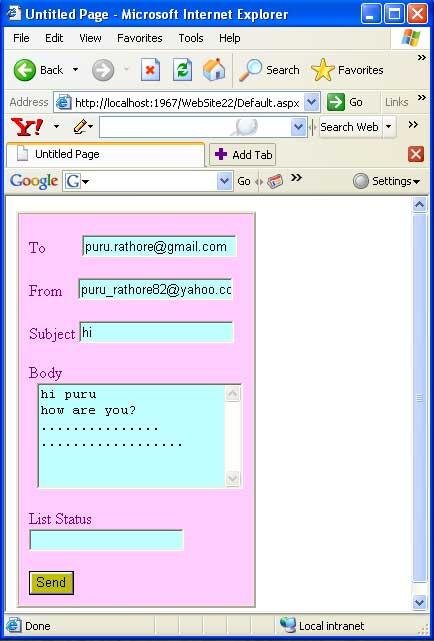
Figure 2: After debug the code this page will open.
After filling all entries click on send button then you will see the following output.
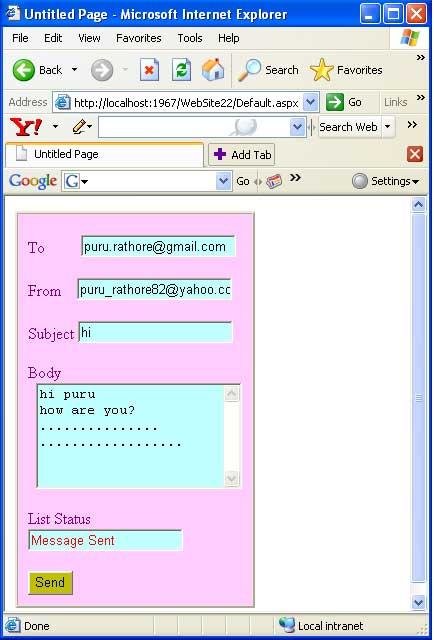
Figure 3: This figure represents the final output.
List status gives the information about the sending message.