GDI+ LinearGradientBrush and PathGradientBrush in VB.NET
In this article you will learn how to use LinearGardientBrush and PathGradientBrush.
Listing 12.6 uses LinearGradientBrush and PathGradientBrush to fill a rectangle and a path. First we create a linear gradient brush and a graphics path, and we add ellipses to the graphics path.
Next we create a path gradient brush, which take the path as its only parameter, and we set the CenterColor property of the path. Then we create Bitmap and Graphics objects and call Graphics.FillPath and Graphics.FillRectangle, which fill a path and rectangle, respectively.
As in the previous examples, finally we call the Bitmap.Save method and dispose of the objects.
LISTING 12.6: Using LinearGradientBrush and PathGradientBrush
Public Class Form1
Private Sub Form1_Load(ByVal sender As System.Object, ByVal e As System.EventArgs) Handles
MyBase.Load
'Create a linear gradient brush
Dim lgBrush As New LinearGradientBrush(New Rectangle(0, 0, 10, 10), Color.Yellow,
Color.Blue, LinearGradientMode.ForwardDiagonal)
'Create a path
Dim path As New GraphicsPath()
path.AddEllipse(50, 50, 150, 150)
path.AddEllipse(10, 10, 50, 50)
'Create a path gradient brush
Dim pgBrush As New PathGradientBrush(path)
pgBrush.CenterColor = Color.Red
'Create a Bitmap and ghraphics object
Dim curBitmap As New Bitmap(500, 300)
Dim g As Graphics = Graphics.FromImage(curBitmap)
g.SmoothingMode = SmoothingMode.AntiAlias
g.FillPath(pgBrush, path)
g.FillRectangle(lgBrush, 250, 20, 100, 100)
curBitmap.Save(Me.Response.OutputStream, ImageFormat.Jpeg)
g.Dispose()
End Sub
End Class
Figure 12.12 shows the output from Listing 12.6
Drawing Transparent Graphics Objects
The alpha component of a color represents its transparency. Alpha component values vary from 0 to 255, where 0 indicates fully transparent and 255 indicate opaque. Listing 12.7 draws a rectangle, an ellipse, and text on top of an image.
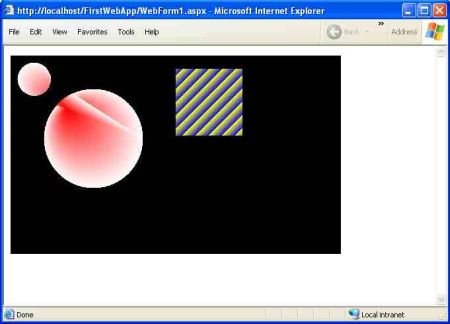
FIGURE 12.12: Using LinearGradeintBrush and PathGradientBrush
LISTING 12.7: Drawing semitransparent objects
'Create a Bitmap and Graphics objects
Dim curBitmap As Bitmap = New Bitmap("C:\\flower13.jpg")
Dim g As Graphics = Graphics.FromImage(curBitmap)
g.SmoothingMode = SmoothingMode.AntiAlias
'Create brushes and pens with alpha values
Dim redColor As Color = Color.FromArgb(120, 0, 0, 255)
Dim alphaPen As Pen = New Pen(redColor, 10)
SolidBrush alphaBrush =
New SolidBrush (Color.FromArgb (90, 0, 255, 0)
'Draw a rectangle, an ellipse, and text
g.DrawRectangle(alphaPen, 100, 100, 50, 100)
g.FillEllipse(alphaBrush, 50, 50, 100, 100)
g.DrawString ("Alpha String", New Font ("Tahoma", 30),
New SolidBrush (Color.FromArgb (150, 160, 0, 0)),
New PointF(20, 20))
curBitmap.Save (Me.Response.OutputStream,
ImageFormat.Jpeg)
g.Dispose()
First we create Bitmap and Graphics objects and set the Graphics smoothing mode. Then we create a color with transparency using the Color.FromArgb method, where transparency is the first parameter. Next, using the following code, we create a pen from this semitransparent color, which gives us a semitransparent pen:
Dim redColor As Color = Color.FromArgb(120, 0, 0, 255)
Dim alphaPen As New Pen(redColor, 10)
We also create a semitransparent brush by passing a semitransparent color as a parameter to SolidBrush as follows:
Dim alphaBrush As New SolidBrush(Color.FromArgb(90, 0, 255, 0))
Now to draw transparent shapes, we simply use the transparent brushes and pens. As Figures 12.13 shows, the graphics shapes are semitransparent.
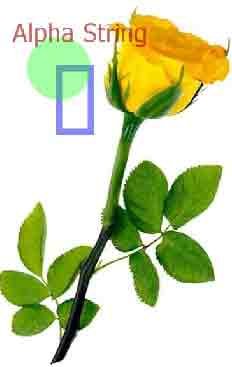
FIGURE 12.13: Drawing semitransparent objects